So you just got yourself a brand new iPhone 16 Pro or iPhone 16 Pro Max? Now, you’ll want to get the very best out of it. To do this, you will have to learn a few tips and tricks.
Here we walk you through the best tips and tricks for iPhone 16 Pro and iPhone 16 Pro Max to help you get the very most out of your handset.
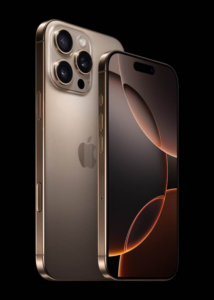
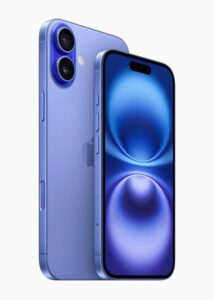
Note: Although these tips are for the iPhone 16 Pro and iPhone 16 Pro Max, they will also work with iPhone 16 and iPhone 16 Plus.
With that in mind, here are the best iPhone 16 Pro and iPhone 16 Pro max tips and tricks you need to try first.
Contents
- 16 Best Tips and Tricks for iPhone 16 Pro
- 1. Use the Camera Control
- 2. Control Your iPhone 16 Pro with Your Eyes
- 3. Try Music Haptics
- 4. Try Vocal Shortcuts
- 5. Lock and Hide Apps
- 6. Customize the Home Screen
- 7. Customize Control Center
- 8. Add Text Effects
- 9. Use an Emoji or Sticker Tapback
- 10. Send a Message to Be Sent Later
- 11. Try the Passwords App
- 12. Convert with Calculator
- 13. View Calculator History
- 14. Try smart dial
- 15. Use Math Notes in Notes
- 16. Record Audio in Notes
- 17. Try Flashlight in Dynamic Island
16 Best Tips and Tricks for iPhone 16 Pro
1. Use the Camera Control
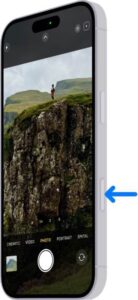
On iPhone 16 and iPhone 16 Pro, you can use the Camera Control to easily and quickly take photos, capture video, and adjust controls. Here’s how.
To open the camera app from the lock screen or from any app, press the Camera Control,.
To take a photo or video on an iPhone 16 with the Camera Control:
- Click the Camera Control to open Camera.
- Press the Camera Control until you feel a click to capture a photo.
-
Press and hold the Camera Control to capture a video.
You can also use the Camera Control to adjust controls in the overlay:
- Light press the Camera Control to access the last control you used, or double light press it to choose a different control.
-
Swipe on the overlay or slide on the Camera Control to switch between controls:
- Use Exposure to increase or decrease the amount of light captured by the camera.
-
While taking a photo, use Depth to increase or decrease the blur in the background and foreground for a stunning portrait.
-
Use Zoom to change your composition, letting you capture a far-off subject or a wide landscape.
-
Use Cameras to switch between default focal lengths, such as 0.5x for ultra wide or 2x for telephoto.
-
Use Styles to select any of the photographic styles like vibrant, cozy, or stark black and white.
-
Use Tone to make shadows richer and darker, or to brighten the midtones of the image.
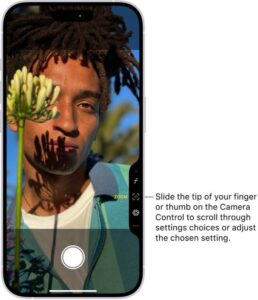
You can change the number of clicks it takes to open Camera with the Camera Control from one click to two. Go to Settings > Camera > Camera Control, then tap Single Click or Double Click.
2. Control Your iPhone 16 Pro with Your Eyes
One of the coolest iPhone 16 Pro tricks is Eye Tracking, which lets you control your device with your eyes.
To set up Eye Tracking on your iPhone 16 Pro:
- Head to Settings > Accessibility > Eye Tracking.
-
Before enabling Eye Tracking, get ready. Place your iPhone on a flat surface and get ready to spend a minute calibrating it.
-
When you enable Eye Tracking, the screen blacks out and a colored dot appears at various places around the screen. Stare at each dot as it appears.
Once calibration is complete, Eye Tracking is enabled on your iPhone 16 Pro and you can move the pointer around with your eyes. It also automatically enables AssistiveTouch and Dwell Control, so you can "tap" an item by continuing to stare at it.
3. Try Music Haptics
Music Haptics is one of the hidden tricks on iPhone 16 Pro that makes your device pulse and vibrate along with the music. Try it out by heading to Settings > Accessibility > Music Haptics and enabling Music Haptics. You can tap Play Sample to get an idea of what it’s like, or just play a song in the Music app.
4. Try Vocal Shortcuts
Vocal Shortcuts is another hidden iPhone 16 Pro trick that lets you utter short phrases to perform actions, such as triggering a shortcut, returning to the Home Screen, or taking a screenshot. It pairs well with the new Eye Tracking feature because it can also do things like scroll up and down, which are difficult to perform with Eye Tracking.
To set it up:
- Head to Settings > Accessibility > Vocal Shortcuts.
-
Tap Set Up Vocal Shortcuts.
-
Tap Continue.
-
Choose an action from the very long list. Scroll Down and Scroll Up are good pairings for Eye Tracking.
-
Enter a name for the custom phrase. For the sake of simplicity, I would start with the name of the action, like "Scroll Down."
-
Tap Go on the keyboard.
-
Say the phrase three times when prompted.
-
Either tap Continue to finish or tap Add Another to add another action.

After the shortcut is set up, using it on your iPhone 16 Prois as simple as saying the command you taught it.
5. Lock and Hide Apps
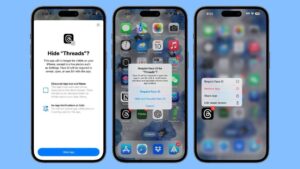
You can lock apps on your iPhone 16 Pro so they cannot be opened without authenticating with Face ID, which adds an extra layer of security to sensitive apps related to things like banking and journaling.
Additionally, you can also hide an app on your iPhone 16 Pro so that it doesn’t appear on the Home Screen. Instead, it’s moved to an obscured Hidden folder in the App Library that cannot be viewed without Face ID authentication.
To lock and unlock an app on your iPhone 16 Pro:
- Touch and hold the app you’d like to lock.
- Tap Require Face ID.
- If you lock an app, it will require Face ID, Touch ID, or your passcode to open or show its content in another app, and the app content will not appear in other places including notification previews and spotlight.

- When you’re ready, tap Require Face ID to lock the app.
- When you’re ready to unlock the app and no longer require authentication to open it, touch and hold it, then tap Don’t Require Face ID.
Now your app no longer requires authentication to open and its content is added back to spotlight.
To hide an app and unhide it on iPhone 16 and iPhone 16 Pro:
- Touch and hold the app you’d like to hide.
- You can hide third-party apps or Apple apps that were downloaded from the App Store.
- Tap Require Face ID and tap Hide and Require Face ID.
- A screen will appear explaining that your app will require face ID, touch ID, or your passcode to reveal, open, or use Siri with the app. The app will also be moved to a folder for Hidden Apps in App Library and you will not receive notifications, calls, or critical alerts from this app.
- When you’re ready, tap Hide App to continue.
- To access your app after you’ve hidden it, swipe left on your home screen until you get to App Library.
- Scroll down to the Hidden folder.
- All devices with iOS 18 or later will have this same Hidden app folder whether you’ve hidden apps on your device or not.
- Now tap Hidden and authenticate with Face ID, Touch ID, or your passcode.
- If you’d like to unlock and unhide the app, touch and hold the app in the Hidden folder, tap Add to Home Screen, and tap Unhide App.
- Now your app will be unlocked and returned to your home screen.
More privacy, more peace of mind.
6. Customize the Home Screen
You can style and theme your iPhone 16 Pro Home Screen. Touch and hold an empty section of the Home Screen, tap Edit in the upper-left corner, and choose Customize.
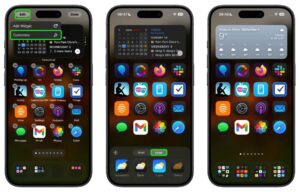
Here are the new options and what they do:
- Small vs. large: At the top are two tabs labeled small and large. The small icons are the traditional smaller app icons with app names underneath. Tap large and the icons grow in size without the app name.
-
Dark mode icons: Additionally, you can set a dark theme for icons. Automatic sets this automatically depending on whether you’re in Light Mode or Dark Mode. Dark makes the icons dark—for instance, white backgrounds become black.
Tapping the sun icon while dark is enabled darkens the wallpaper as well. Choosing Light displays the icons as you’re used to them. Additionally, you can use the color picker to choose a color from your wallpaper so the icon tint matches your background:
- Tap the color picker. The screen blurs and a color picker grid appears on screen.
-
Drag the color picker around the screen to pick a color. The selected color is shown in the innermost square.
-
When you let go of the color picker, whatever color is in that center square is selected as the icon tint.
7. Customize Control Center
Control Center is completely customizable on iPhone 16 Pro: you can add, remove, and rearrange any controls you want. Also, you can have multiple pages in Control Center you can swipe through—as many as will fit on the screen.
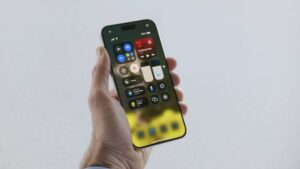
To customize Control Center on your iPhone 16 Pro, touch and hold an empty area on the screen. Then you can:
- Add a control: Tap Add a Control at the bottom of the page and tap one of the controls.
-
Add a screen: Tap the new screen icon to the right of Control Center (or swipe to the bottom) and add a control.
-
Move a control: Touch, hold, and drag the control to a new position.
-
Resize a control: Touch, hold, and drag the drag handle in the lower-right corner of the control.
-
Delete a control: Tap the delete button on a control.
-
Remove a screen: Delete all the controls from that screen.
-
Exit edit mode: Swipe up from the bottom of the screen.
8. Add Text Effects
On iPhone 16 Pro, you can style any individual letter, word, or emoji in an iMessage, or the entire message itself. While composing an iMessage in the Messages app, tap the new text effects icon above the keyboard to reveal a panel of effect options:
- Bold
-
Italic
-
Underline
-
Strikethrough
-
Big enlarges the text for emphasis.
-
Small shrinks the text for a subtle impact.
-
Shake makes the text shake as if saying, “no.”
-
Nod animates the text to nod in agreement.
-
Explode makes the text expand in an arc and explode off the screen.
-
Ripple creates a ripple effect starting from the first character.
-
Bloom enlarges and bolds the text one character at a time.
-
Jitter vibrates the text with nervous energy.
There are two ways to apply these effects:
- Tap an effect to select it before you start typing.
-
Select the text and then tap the desired effect. To select the text, double tap to select a word and then drag the blue drag handles to select what you want.
To remove the effect: select the text and apply the same effect again. To remove it from a single character, it’s often easier to select the entire word, apply an effect, and then tap that effect again to remove it.
9. Use an Emoji or Sticker Tapback
Most other messaging apps let you respond with any emoji, and now so does the native Messages app on iPhone 16 Pro. Touch and hold a received message in Messages to see a bubble with tapback responses. You can swipe from right to left to reveal more options, which include commonly used emojis.
To instead add a custom emoji, swipe left to right all the way to the end, tap the emoji icon, and choose an emoji from the menu.
You can also tap Add Sticker from the menu to choose any installed sticker as a Tapback response.
10. Send a Message to Be Sent Later
On iPhone 16 Pro, you can schedule iMessages to send up to two weeks in advance, which is useful for things like wishing a friend a happy birthday. It doesn’t mater whether your device is powered on or online when the scheduled time arrives; it will be sent regardless.
Here’s how to schedule an iMessage on your iPhone 16 Pro:
- While in a conversation and after composing a message, tap the plus button.
-
Choose Send Later from the menu.
-
Choose your date and time with the date picker.
-
Tap the send button.
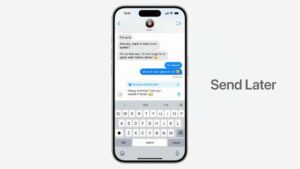
The scheduled message “floats” in the conversation, denoted by a bubble with a white background and a dashed blue outline. To change the time or delete the message, tap Edit above the message and then choose either Edit Time or Delete Message.
11. Try the Passwords App
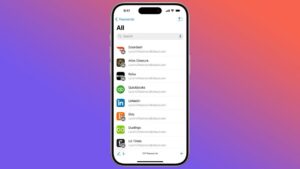
Passwords app on iPhone 16 Pro supports sharing password groups with friends and family, generating new passwords, storing two-factor authentication (2FA) codes, and managing passkeys.
12. Convert with Calculator
The Calculator app on iPhone 16 Pro has a built-in conversion function. To access it, launch the Calculator app, tap the calculator key, choose either Basic or Scientific, and then turn on Convert.
When in Convert mode, Calculator shows two numbers in the display. Just pick one and then tap the unit designation, denoted by double arrows. This reveals a vast menu of conversion units separated by category, such as currency, data, energy, fuel, force, temperature, time, volume, and weight. You can also search conversion units, which is good because the menu is overwhelming.
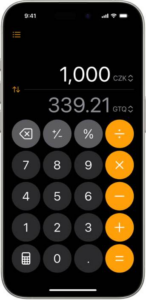
Once you select a conversion unit in one result field, repeat the same steps for the other field. Be sure to choose a unit in the same category, otherwise the category for the other field will change (you can’t convert bytes to kilograms, come on now).
Once your units are set, tap the number in one result field to see the conversion in the other field.
13. View Calculator History
On iPhone 16 Pro, you can view your calculation history, which is handy for looking up previous results, which you can then alter or copy to paste elsewhere.
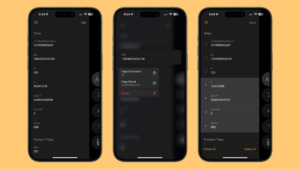
To view history on your iPhone 16 Pro Calculator app, tap the menu icon. Tap a calculation to return to it. You can also touch and hold a calculation to reveal a menu that lets you copy either the expression (equation) or the result.
14. Try smart dial
The dialer in the Phone app has a couple of upgrades to make it smarter:
- Search in Recents: There is now a Search field on top of the Recents tab, where you can search through recent calls by date, keyword, name, or phone number.
-
Search with the keypad: On the Keypad tab, you can now tap the digits to spell out contact names based on the letters on each key. For example, you can type 563 to type out “joe.” The top result appears at the top, which you can tap to call. More results underneath, and you can tap to see the full list.
15. Use Math Notes in Notes
If you’re like me and use Notes for everything, you might find yourself using it to write down financial information like bill amounts or taxes due instead of using a spreadsheet or calculator.
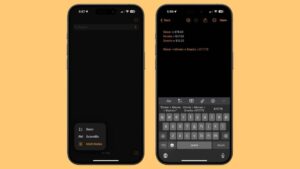
Thankfully, Apple has recognized us and our plight with a new feature called Math Notes, which lets you perform calculations inside a note, either by typing them out or even writing them freehand.
Let’s examine some examples of what you can do with Math Notes.
Try typing something like this in a note: 4×4= . After the equals sign ( = ), Notes autofills the answer in yellow. Tap Return on the keyboard to insert the answer into the note. If you tap outside the calculation, it will lose the result, so be sure to tap Return to insert it.
You can also insert the answer from the QuickType bar above the keyboard. It also usually offers some other options, like reformatting the equation. For instance, it can transform 2/3 4/5= into 2÷3 4÷5= .
You can do conversions as well. Try typing something like 4 tablespoons in cups = and it will autofill 0.25 cups .
Math Notes also understands variables. You can type:
- a=5
-
b=2
-
And then type a b= to autofill 7 .
Play around and see what else Math Notes can do!
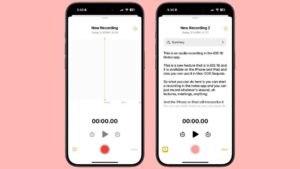
16. Record Audio in Notes
You can directly record voice memos inside a note on your iPhone 16 Pro. Here’s how:
- Tap the paperclip icon
-
Choose Record Audio from the menu.
-
Tap the red record button to start recording.
-
You can tap the pause button to temporarily stop recording. Tap Resume to continue.
-
While recording, you can tap the transcript button to view a live transcript of your recording.
-
To name a recording, tap the more button, choose Rename, and type in a new name. Tap outside the text field to set the name.
-
When you’re finished with the recording, tap Done.
-
To play back a recording inside a note, tap Play on the note. Controls appear for pause, 15 seconds back , and 15 seconds forward .
17. Try Flashlight in Dynamic Island
If you often use flashlight, the new flashlight control on dynamic island might be the coolest feature on iPhone 16 Pro. When you turn on the flashlight, a window appears at the top of the screen with a large flashlight icon that you can touch, hold, and drag to adjust the beam. Slide your finger up and down to adjust the brightness and side to side to change the focus of the beam. Tap outside the window to dismiss it. To bring it back, tap the flashlight icon in the Dynamic Island while the flashlight is on.


