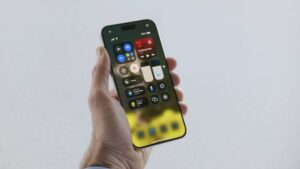
In iOS 18 and iPadOS 18, Apple has introduced a customizable Control Center. In previous versions of iOS, you could add and remove certain controls, but many were stuck there whether you used them or not. The redesigned Control Center now features multiple pages you can switch among by swiping up and down on the screen.
In this guide, i’ll explain how to customize and use Control Center in iOS 18 on your iPhone.
To access Control Center on iPhones with Face ID and on iPads, swipe down from the top right corner of the screen. On iPhones without Face ID, swipe up from the bottom of the screen.
Control Center gives you instant access to the things you do most on your iPhone. You can change network settings, brightness, audio controls, and more. To access additional options, touch and hold a control.
How to customize and use Control Center in iOS 18
Control Center in iOS 18 is comprised of buttons, sliders, and platters (groups of buttons). As you resize those controls, they might change shape. For example, a slider might transform into a button.
Many controls in Control Center also have hidden panels. To reveal these hidden functions, simply touch and hold a control.
As I’ve mentioned above, Control Center is now 100% customizable: you can add, remove, and rearrange any controls you want. You can even have multiple pages in Control Center that you can swipe through—as many as will fit on the screen.
To customize Control Center on iOS 18, touch and hold a blank area on the screen. Then you can:
- Add a control: Tap Add a Control near the bottom of the page and tap on the control you want to add.
- Add a screen: Tap the new screen icon located on the right side of Control Center (or swipe to the bottom) and add a control.
- Move a control: Touch, hold, and drag the control to your desired position.
- Resize a control: Touch, hold, and drag the handle and move it up, down, or diagonally. Release it when the icon is the size you wish.
- Delete a control: Tap the minus sign for the control you want to remove.
- Remove a screen: Delete all the controls from that screen.
- Exit edit mode: Swipe up from the bottom of the screen.
Control Center Functions
Here is a breakdown of different control categories, which controls are in each one, and their functions:
Accessibility Controls
The Accessibility section has a small subset of accessibility features:
- Accessibility Shortcuts: Tap this icon to quickly access Accessibility features. You can choose what appears here by going to Settings > Accessibility > Accessibility Shortcut.
- Assistive Access: Assistive Access offers a simplified version of the interface with big buttons and limited gestures. If Assistive Access has been set up in Settings > Accessibility > Assistive Access, this button enables it. However, once Assistive Access is on, you can’t access Control Center, so you have to triple-click the side/top button to turn it off.
- Guided Access: The Guided Access control enables Guided Access for the current app, which limits the device to display only that one app. Until Guided Access is turned off, the user is locked in the designated app, which is handy for young children. To set it up, go to Settings > Accessibility > Guided Access.
- Live Speech: Live Speech lets you type things and have them sounded out. If Live Speech is enabled in Settings > Accessibility > Live Speech, this button triggers it, which adds a text bubble on the screen you can type into.
Capture
Capture collects all the ways your iPhone can accept visual input:
- Camera: Tap this button to launch the Camera app. Touch and hold it to access specific camera modes that vary depending on the iPhone model.
- Magnifier: Tap this button to launch the Magnifier feature, which uses your camera like a magnifying glass, letting you zoom in on small text and other hard-to-see things. On newer devices, it also has a Detection Mode that can identify objects and read signs.
- Scan Code: Tap this button to launch a scanner for QR codes. The Camera app can read those codes.
Clock
The Clock controls let you set alarms and timers, and access the stopwatch:
- Alarm: Tapping this button launches the Clock app to the Alarm tab. Touch and hold to reveal a menu where you can create an alarm, start a stopwatch, or start a timer.
- Stopwatch: Tap this button to launch the Clock app to
the Stopwatch tab. Touch and hold it to quickly start, reset, or stop the Stopwatch without needing to open the app.
- Timer: This button opens the Clock app to the Timer tab. Touch and hold to set a specific time right from the Control Center.
Display
The Display section gives you control over brightness and more:
- Brightness: Adjust the brightness of your display by sliding this control. Touch and hold for quick access to Night Shift and True Tone.
- Dark Mode: Tap this button to toggle Dark Mode on or off. Dark Mode reduces strain on your eyes by applying a darker color scheme to the display.
- Text Size: Tap this control to adjust the system-wide text size. Touch and hold it to access more options, such as Bold Text.
Focus
Tap the button to choose a Focus, or tap the icon on the button to enable the currently selected Focus, which disables notification alerts, FaceTime calls, and phone calls—handy when you want to block noise, vibration, or your screen’s backlight. Timers and alarms set in the Clock app override Do Not Disturb.
Hearing Accessibility
Apple offers a dedicated section just for hearing accessibility features:
- Background Sounds: Background sounds is basically a white noise generator for your iPhone. Tap this button to turn on the sound. Touch and hold it to select different sounds and change the volume.
- Headphone Accommodations: This setting enables you to customize the sound settings for Apple and Beats earbuds and headphones, which you can tune by going to Settings > Accessibility > Audio & Visual > Headphone Accommodations. Tapping this button in Control Center offers you the ability to enable or disable it individually for phone sounds and media.
- Headphone Levels: This control displays the current volume of your headphone audio, in decibels.
- Hearing: This button presents you with several settings at once: Background Sounds, Headphone Accommodations, and Live Listen.
- Left-Right Stereo Balance: You can adjust the balance between the left and right audio channels by going to Settings > Accessibility > Audio & Visual. The Left-Right Stereo Balance button toggles the setting.
- Live Captions: This button enables or disables a floating window that listens for audio on your device and transcribes it in the window.
- Live Listen: If you have AirPods connected, this button lets you toggle the Live Listen feature, which turns your AirPods into a listening device, with the iPhone or iPad acting as a microphone.
- Music Haptics: This button enables a feature that vibrates the phone to the tune of whatever music is playing, so the hearing impaired can still experience it.
- Sound Recognition: This button triggers an accessibility feature that listens for certain sounds—like alarms, crying babies, glass breaking, and pets—and alerts you if your device hears them. Tap it once to turn on the feature. Touch and hold to select the sounds to listen for. Siri doesn’t work when Sound Recognition is enabled. You can adjust these settings by going to Settings > Accessibility > Sound Recognition.
Home Controls
If you have HomeKit home automation accessories, the Home controls offer you quick access to controlling your accessories and scenes.
There are three Home controls, of which two are labeled Home. Here’s what each one does:
- The first Home control is a platter that tries to show you the accessories and scenes it thinks you’ll want to use at any given time. Tap the icon on an accessory’s button to turn it on or off. Tap the button outside the icon to see advanced controls, such as light brightness. The larger you make this control, the more accessories and scenes it shows.
- The second one, named Scene or Accessory, is a widget that lets you create a custom shortcut to any accessory or scene you want. Tap it before dismissing editing mode to change what the button controls.
- The second Home control just launches the Home app. Touch and hold it to reveal a quick menu of scenes.
Motor Accessibility
Control Center in iOS 18 provides shortcuts to several accessibility features focused on motor function:
- Apple Watch Mirroring (iPhone only): If you have an Apple Watch connected, tapping this button launches a panel that shows your watch’s display on the iPhone’s screen.
- AssistiveTouch: AssistiveTouch lets you emulate button presses and gestures from a control panel. Tap this button to show a floating white button on the screen that you can tap to reveal the menu. You can customize the menu by going to Settings > Accessibility > Touch > AssistiveTouch.
- Control Nearby Devices: Tap this button and choose another Apple device, like a nearby iPhone, that you’d like to control remotely. Controls for that device are displayed on screen.
- Eye Tracking: This activates a feature for newer iPhones that lets you control an onscreen pointer with your eyes. Tapping this engages a calibration mode that you can’t exit—you must stare at a moving dot on the screen until the process is finished.
- Full Keyboard Access: This feature lets you control onscreen elements with an external keyboard—either connected via USB or paired over Bluetooth in Settings > Bluetooth.
- Switch Control: This feature lets you control your iPhone with an external switch. Onscreen elements are slowly cycled through and you can use the switch to activate them. You can set this up in Settings > Accessibility > Switch Control.
- Voice Control: This button audibly reads onscreen elements and anything you tap to select.
Notes
Control Center in iOS 18 offers a couple of controls for the Notes app:
- Notes: Tapping this button while your iPhone is unlocked launches the Notes app. But tap it while your device is locked to create an Instant Note, which is like a regular note, except that it’s accessible from the Lock Screen for an amount of time set in Settings > Notes > Access Notes from Lock Screen.
Touch and hold the Notes button to see these options:
- New Note: Launch Notes with a new note.
- New Checklist: Launch a new note with a checklist already created.
- New Photo: Tap this button to create a new note and launch the Camera to capture an image for the note.
- Scan Document: Scan a document with the camera and add it to a note.
- Quick Note: Tap this button to launch a window that lets you jot down a note without having to launch the Notes app and tap an icon to create a new note. These notes are saved to the Quick Notes folder in the Notes app.
Now Playing
The media platter lets you control background audio, such as music and podcasts, as well as playback on AirPlay devices like the Apple TV and HomePod. The platter shows the following:
- Track information: For music, the platter shows the track and artist. When playing a podcast, it shows the episode title and the show name.
- Skip buttons: When playing music, these display as previous and next track buttons. If a podcast is playing, they appear as skip buttons, which are handy for catching a line you missed or bypassing ads. Other apps may present different icons here.
- Play/Pause: These buttons simply play or pause the audio.
- Output: Tap the Output icon in the top-right corner to pick an audio or AirPlay video output.
Tapping the platter gives you access to three more controls:
- Favorite: Add this track to your Apple Music favorites.
- Scrubber: This shows how far you are into an audio track and the total duration. Drag the white knob to change the playback position.
- Volume: Drag the white knob to adjust the playback volume.
Tap Control Other Speakers & TVs and then tap a device to switch to controlling that device. Even after exiting that screen, the media platter’s controls continue affecting that device until you switch it.
Remote
Tap Apple TV Remote to bring up a virtual remote that you can use to control your Apple TV HD or Apple TV 4K. You can select which device you control at the top of the screen.
Shortcuts
These two controls offer you quick access to any app or shortcut. To set these controls, tap one after placing it on the screen but before leaving edit mode and then choose the app or shortcut you want that control to launch.
- Launch App: Tapping this button launches the associated app.
- Shortcuts: This button triggers the selected shortcut.
Sounds
These two controls let you recognize music or adjust the system volume:
- Recognize Music: What’s the name of that song? This turns on built-in Shazam song recognition, which listens to a song through the microphone and tries to identify it. (Apple owns Shazam.)
- Volume: Adjust the system volume to your desired level. Touch and hold the slider to see a larger volume control on an iPhone.
Translate
The translate button just launches the Translate app.
Utilities
- Announce Notifications: If you have AirPods or CarPlay paired with a device, this feature audibly announces notifications as you receive them.
- Calculator: Tap this button to launch the Calculator app. Touch and hold it to reveal an option to copy the last Calculator result.
- Feedback Assistant: While running beta operating systems, this button appears to help you report problems.
- Flashlight: Tapping Flashlight turns on the LED flash on iPhones and iPads that have one, turning your device into a flashlight. Press it to reveal a slider that lets you adjust the flashlight’s brightness.
- Low Power Mode: Turns Low Power Mode on or off. Low Power Mode turns off or adjusts certain features to extend battery life, like decreasing screen brightness, locking the screen after 30 seconds, disabling 5G, and turning off background app refresh.
- Keyboard Brightness (iPad only): This can adjust the keyboard brightness on an Apple Magic Keyboard, but no other model.
- Print Center: If you have an AirPrint-capable printer that works with iOS and iPadOS, this button shows the print queue.
- Stage Manager: This button appears only on compatible iPads. Tapping it triggers the Stage Manager feature, which lets you display multiple windows on screen at once. Touch and hold it to reveal options to show or hide Recent App and the Dock.
Vision Accessibility
As with the other accessibility categories, Apple has a dedicated Control Center section for vision:
- Classic Invert: This feature inverts every color on screen, including in photos and videos. Consider Smart Invert instead.
- Color Filters: This feature places a colored filter over your screen. You can set the color, hue, and intensity of the color filter in Settings > Accessibility > Display & Text Size > Color Filters.
- Dim Flashing Lights: When this is enabled, the screen dims automatically whenever flashing lights are detected on screen.
- Hover Text: This feature puts a magnifier on the screen that you can drag around to see small things better.
- Hover Typing: This feature displays a black box on screen that shows whatever you are typing. The idea is that you can change the colors and fonts to make it easier to see what you’re typing, which you can adjust in Settings > Accessibility > Keyboards & Typing > Hover Typing.
- Increase Contrast: Tapping this button makes background colors lighter and foreground colors darker.
- Live Recognition: The Live Recognition feature in Measure can identify doors and other objects and announce them audibly.
- Reduce Motion: This setting reduces visual effects that simulate motion.
- Reduce Transparency: This setting reduces onscreen transparency effects, replacing them with plain gray.
- Reduce White Point: This effectively reduces your overall screen brightness, even more so than the Brightness control, which can make your device more comfortable in dark rooms.
- Smart Invert: This inverts all the colors on screen except for photos and media, so it looks much better than Classic Invert.
- Speak Screen: Tapping this button takes you to Settings > Accessibility > Spoken Content. If you enable Speak Screen there, the Speak Screen button reads out loud the contents of your screen. A black box appears with playback controls.
- Vehicle Motion Cues: Do you get carsick when reading? Vehicle Motions Cues aims to fix that by placing small dots on the screen designed to offset the sensory conflict that causes carsickness. Tap this button and choose either On or Only in Vehicle.
- VoiceOver: This feature speaks out onscreen visual elements and anything you tap. Tapping this button turns VoiceOver on and off. Be aware that gestures work differently when VoiceOver is enabled.
- Zoom: Tapping this button displays an onscreen magnifying glass that you can move by touching, holding, and dragging its edges.
Voice Memos
Tap the Voice Memos button to start a recording. A box with a stop button briefly appears in case you tapped this by accident. To stop the recording after that, you have to launch the Voice Memos app and press Stop. To access the Voice Memos app while recording, tap the time at the upper-left corner of the iPhone screen or the microphone icon at the upper-right corner of the iPad screen.
Wallet
- Wallet (iPhone only): Tap Wallet to launch the Wallet app. Touch and hold for shortcuts like payment methods and recent transactions.
- Tap to Cash (iPhone only): This feature lets you pay a friend with Apple Cash by touching one iPhone to another. Tap this button to trigger it.
Watch
Tap Ping Watch to have your paired Apple Watch make a beacon noise so you can find it.