Apple has slowly been building up their password-management capabilities for years. With iOS 18, Apple created a standalone Passwords app that streamlines login and password management.
In this guide, I will show you how to use Passwords app in iOS 18.
Passwords supports sharing password groups with friends and family, generating new passwords, storing two-factor authentication (2FA) codes, and managing passkeys.
Contents
How to Use Passwords App in iOS 18
The Passwords app is automatically installed with iOS 18, which is compatible with the iPhone XR and later models.
After updating your iPhone to iOS 18, you’ll find the icon for the Passwords app on your Home Screen. It’s the one that displays three keys. Launch the app, and the welcome screen briefly explains how the app works and how to use it. Tap Continue, and authenticate with your Face ID or touch ID.
If you’ve previously used the iCloud Keychain feature, all of your saved logins and passwords will be ready to go as soon as you authenticate with Face ID or Touch ID.
Explore the Passwords Home Screen
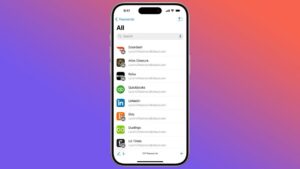
The Passwords app has a simple layout with a search bar right at the top, so you can look up the information that you’re looking for. The main difference between the iOS 18 Passwords app and the old settings menu is that it opens to a nice home screen with a search bar, entry categories, and access to shared password groups. Here’s what each category contains:
- All: Tap this to see all of your password entries. On the All screen, tap the Sort icon to bring up a menu of sorting options.
-
Passkeys: This screen shows all your passkeys. A passkey is a secure token that takes the place of a password. Instead of typing a password, you authenticate with Face ID or Touch ID, which is easier and more secure.
Many websites now offer passkey login options, usually in addition to a password, though every site handles this differently. Often, you are prompted to create a passkey when you log in, and it’s securely stored in Passwords.
- Codes: Many sites now encourage or require two-factor authentication (2FA), which usually equates to a constantly changing code that you have to enter alongside a password. The Codes screen shows all these codes, and you can tap the add icon to create a new one from a provided code or by scanning a QR code.
-
Wi-Fi: This stores the passwords of Wi-Fi networks you have connected to in Settings > Wi-Fi.
-
Security: The Security screen lists passwords that should be changed, either because they’re weak or reused or have been compromised. Tap a password to see the recommendation, which usually provides a Change Password button to send you to the page to reset that site’s password.
-
Deleted: This screen shows any passwords you have deleted, which are retained for 30 days before vanishing forever. To rescue a password on the Recently Deleted screen, tap it and then tap Recover.
Add or Edit a Password
Usually, iOS and iPadOS guides you through creating and storing a password when creating a new login in Safari. But you often need to return to edit that password to change it, add a note, or add a 2FA code. It’s also good to know how to create a password entry from scratch:
- Tap All.
- Tap the Plus button to add a new password, or tap an existing password to edit it and then tap Edit.
Either way, the fields are the same:
- Website, App, or Label: This is just the name of the password. It can be whatever you want but should be descriptive so you can find it.
-
User Name: The name you use to log in, usually an email address.
-
Password: If the field is blank, Passwords will automatically generate a secure password. You can delete it and add your own.
-
Group: If you have shared groups set up, you can assign one here to share it with other people.
-
Notes: Any secure notes you would like to add. This is a good place to add recovery keys, and security questions with answers.
Annoyingly, there are certain fields you can’t access while creating a new password, so you have to return and edit it:
- Set Up Verification Code: Tap this if you’re setting up 2FA for a login. Typically you do this on the site’s security settings page, and the site provides a code (which you can enter by typing into the Setup Key field and tapping Use Setup Key), or it displays a QR code (which you can scan by tapping Scan QR Code with Camera).
-
Change Password: This button doesn’t change your password in the app. Instead, it takes you to the website to change your password there, which should be picked up by Safari, which prompts you to update your password.
-
Website: This is the URL or URLs where you want to be prompted to autofill this password. Two tips I can offer here:
-
You can keep tapping Add Website to add additional associated URLs for that password. This is especially handy for Microsoft properties, because they love having multiple domains that use the same login information, like microsoft.com, live.com, xbox.com, and linkedin.com.
-
Make the URLs as plain as possible. So instead of entering the URL as outlook.live.com, which will only work on the Microsoft Outlook site, set the URL to live.com, which will work with all live.com subdomains.
You can share any password or passkey over AirDrop by opening it and then tapping the share icon. However, it’s much better to set up a group for sharing passwords to keep them in sync.
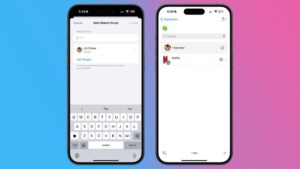
To create a new password group:
- On the main screen of Passwords, tap the New Group icon.
- Enter a group name on the New Shared Group screen.
- Tap Add People to add others to the group. Enter a name from your contacts, tap their entry, and then tap Add.
- Back on the New Shared Group screen, tap Create.
- You’re notified if you have any incompatible devices. Tap Continue.
- You’re presented with a list of your passwords. Tap the ones you want to move to the new group and tap Move to finish.
Common actions for shared password groups:
- Change a password’s group: While viewing a password, tap Edit and then Group as described above.
-
Add a member to a group: From the main Passwords screen, tap the group, tap X Members, and then tap Add People.
-
Remove a member from a group: From the main Passwords screen, tap the group, tap X Members, tap the person to remove, and then tap Remove From Group.
-
Delete a group: From Password’s main screen, tap the group, tap X Members, and then tap Delete Group. After the group is deleted, the passwords you shared return to your private collection and you lose access to the passwords others shared with you.
Autofill Passwords
Your device can manage passwords for websites and apps, or help you fill in passwords from your favorite password manager—either Apple’s Passwords or another, like 1Password.
To set up password autofill to use a third-party app:
- Go to Settings > General > AutoFill & Passkeys and enable the apps you’d like to access passwords from, such as 1Password, Proton Pass, or Passwords.
When you log in to a website or app, if iOS or iPadOS recognizes that you have an associated login, it prompts you to use that login and you’ll have to verify with Face ID or Touch ID. Different login options appear in the QuickType bar above the keyboard. You can tap the key icon to see all available logins.