There are so many handy time-saving tricks hidden away in iOS 18 that there’s a good chance you’re missing at least one or two. Here are 10 tips, any of which could be key to turbo-charging your productivity.

Contents
- 10 iOS 18 tips to BOOST your productivity
- 1. Custom Lock Screen Widgets by Focus Mode
- 2. Send Messages later
- 3. Customize your own Control Centre
- 4. Create a Wi-Fi code in seconds
- 5. Siri & Reminders & Calendar
- 6. Remote fix problems
- 7. Notes annotation (AI)
- 8. Record phone calls (AI)
- 9. Reduce Interruptions Focus Mode (AI)
- 10. Mail & Apple Intelligence (AI)
10 iOS 18 tips to BOOST your productivity
1. Custom Lock Screen Widgets by Focus Mode
Focus modes in iOS 18 allow you to change not only the functionality of your iPhone based on your current activity but also the look and feel of your lock screen, including the widgets. This can be especially useful if you want different shortcuts or app launchers depending on whether you’re in work mode, personal mode, or any other custom focus mode.
Steps to Customize Lock Screen Widgets for Focus Modes
- Activate Your Focus Mode:
- Start by activating the specific focus mode you want to customize. You can do this from the Control Center or by going to Settings > Focus.
- Enter Lock Screen Edit Mode:
- Once your focus mode is activated, tap and hold on your lock screen to enter the lock screen customization mode.
- Select “Customize”:
- At the bottom of the screen, you’ll see an option to “Customize.” Tap on this to enter the detailed lock screen editing interface.
- Edit the Lock Screen Widgets:
- Tap on the lock screen again to focus on the widgets at the bottom.
-
You’ll see minus buttons next to the current lock screen widgets (usually the torch on the left and the camera on the right). Tap the minus button to remove a widget.
-
Add New Widgets:
- After removing a widget, a plus icon will appear in its place. Tap the plus icon to open a list of available options you can add to your lock screen.
-
Options: You can select from various system functions or app-specific shortcuts. For a more personalized experience, scroll down to the Shortcuts section and select Open App.
-
Choose an App: After selecting “Open App,” choose any app on your iPhone to assign it as a launcher to that lock screen widget.
-
Test the Customization:
- Once you’ve set up your widgets for the current focus mode, you can exit the focus mode and switch to another one. You’ll see that the widgets at the bottom of your lock screen change according to the focus mode you have enabled.
2. Send Messages later

In iOS 18, the Messages app has introduced the long-awaited ability to delay sending a message, similar to how you can schedule emails. This feature is incredibly useful for those moments when you think of something you need to communicate later but want to draft and schedule it immediately.
How to Schedule a Message in iOS 18
- Compose Your Message:
- Open the Messages app and start typing your message as usual.
- Schedule the Message:
- After writing your message, tap the plus ( ) button located to the left of the message composition field.
-
From the menu that appears, select Send Later.
-
A date and time picker will appear. Choose the date and time you want the message to be sent. For example, if you want it sent the next morning, select the next day and your preferred time.
-
Confirm and Send:
- After selecting your desired time, tap Send. The message will be scheduled and will automatically send at the time you specified.
Managing Scheduled Messages
- Editing the Message:
- If you need to make changes to the message before it’s sent, tap and hold on the scheduled message in the chat. You’ll see an option to Edit. Make your changes and confirm.
- Changing the Send Time:
- If you need to adjust the send time, tap the edit button next to the date and time stamp on the scheduled message. You can then choose a new date and time.
- Deleting the Message:
- If you change your mind and no longer want to send the message, tap and hold on the scheduled message and select Delete.
3. Customize your own Control Centre

iOS 18 introduces a highly customizable Control Centre, making it easier to streamline your productivity by removing clutter and prioritizing the tools you use most frequently.
Entering Edit Mode in Control Centre
- Access Control Centre:
- Swipe down from the top right corner of your iPhone screen to open the Control Centre.
- Enter Edit Mode:
- Tap and hold on the Control Centre screen until it enters edit mode. Each icon in the Control Centre will now display a minus (-) button in the top left corner, allowing you to remove items you no longer need.
Removing Unnecessary Items
- Remove Clutter:
- In edit mode, tap the minus button on any icon you rarely use to remove it. For example, if you don’t adjust the volume from the Control Centre, you can remove the volume slider to declutter your Control Centre.
Customizing and Expanding Controls
- Expand Essential Controls:
- If there’s a function you use frequently, like screen recording, you can use the drag handle in the bottom right corner of the icon to expand it, making it a more prominent button. This allows for quicker access and greater usability.
Adding New Controls
- Add a Control:
- Scroll to the bottom of the Control Centre in edit mode and tap Add a Control.
- Choose from Available Options:
- You’ll see a list of options you can include in your Control Centre. This is divided into different sections, with Shortcuts being the most customizable.
- Customize Shortcuts:
- In the Shortcuts section, you can choose Open App to assign an app launcher to a tile, giving you quick access to specific apps directly from the Control Centre. Alternatively, select Shortcuts to add any pre-existing shortcuts you’ve created on your device. This allows you to execute complex tasks or workflows with a single tap.
4. Create a Wi-Fi code in seconds
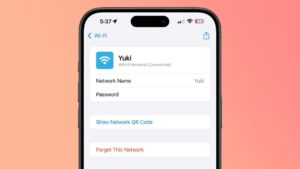
One of the handy new features in iOS 18 is the ability to generate a WiFi QR code directly from your iPhone.
How to Generate a Wi-Fi QR Code
- Open the Passwords App:
- iOS 18 includes a dedicated Passwords app. You can find it by searching for “Passwords” in Spotlight or scrolling through your apps.
-
Once you open the app, you’ll see a section specifically for Wi-Fi codes.
-
Select a Wi-Fi Network:
- The Wi-Fi network you’re currently connected to will appear at the top of the list, followed by any other networks your phone has remembered.
-
Tap on the network you want to share.
-
Generate the QR Code:
- After selecting the network, tap Show Network QR Code.
-
Instantly, a QR code will be generated for that Wi-Fi network.
-
Share the QR Code:
- Others can scan this QR code with their device to quickly join your Wi-Fi network without needing to enter the password manually.
-
You can also screenshot the QR code and print it to place around your home or office, making it easily accessible to guests.
5. Siri & Reminders & Calendar
iOS 18 introduces a powerful integration between the Reminders app and the Calendar, significantly enhancing productivity by allowing you to see and manage your reminders directly within your calendar.
Creating a Reminder from the Calendar App
- Open the Calendar App:
- Launch the Calendar app on your iPhone.
- Create a New Event or Reminder:
- Tap the plus ( ) button to create a new event.
-
At the top of the screen, you’ll now see an option to create a Reminder instead of an event. Select this option to create a reminder that will appear in both your Reminders app and your Calendar.
Using Siri to Create Calendar-Integrated Reminders
-
Siri Integration:
- If you have an email or any other item open and want to set a reminder, simply activate Siri by holding the side button or saying “Hey Siri.”
-
Say something like, “Remind me about this today at 4pm.”
-
This creates a reminder that not only shows up in the Reminders app but also appears as a timed event in your Calendar app.
Managing Reminders from the Calendar
-
View and Complete Reminders:
- With iOS 18, reminders now appear in your Calendar at the specified times, allowing you to manage your day more effectively .
-
You can see your reminders alongside your events, making it easier to plan your day and ensuring that important tasks don’t get overlooked.
Quick Access to Email from Reminders
One limitation is that you can’t directly tap a reminder in the Calendar app to jump back into an email or other app context. However, there’s a simple workaround:
- Tap and Hold the Reminder:
- In the Calendar app, tap and hold the reminder.
- Access Contextual Menu:
- A contextual menu will appear. Tap the right arrow to see more options.
- Choose “Show in Reminders”:
- Select Show in Reminders. This takes you to the Reminders app, where you can tap on the mail icon or any other relevant app icon linked to the reminder.
- View or Act on the Email:
- From the Reminders app, you can jump directly back into the email or other app content related to that reminder, making it easy to follow up on tasks without losing context.
6. Remote fix problems
iOS 18 introduces a game-changing feature for those who often find themselves providing tech support for family and friends: SharePlay during FaceTime calls.
Initiating Screen Sharing on FaceTime
- Start a FaceTime Call:
- Begin a FaceTime call with the person you’re helping.
- Tap the Share Button:
- Once the call is connected, tap the Share button at the top of the screen.
- Choose a Sharing Option:
- You have two options:
- Share Your Screen: This allows the other person to see your screen, which can be useful if you want to demonstrate something.
-
Request Screen Share: Ask the other person to share their screen so you can view it on your device.
- You have two options:
-
Maximise the Shared Screen:
- Once the other person shares their screen, they can exit FaceTime, and their screen will be mirrored on your device. Tap to maximize it for a full-screen view on your iPhone.
- Drawing and Annotating:
- By default, any gestures, swipes, or drawings you make on their shared screen will appear on their device, allowing you to guide them through the steps they need to take. This feature is great for showing them exactly which buttons to press or how to navigate through settings.
Taking Remote Control of Their iPhone
- Tap the Remote Control Button:
- If you need to directly interact with their device, tap the Remote Control button located in the bottom right corner of your screen.
- Request Permission:
- The person you’re helping will receive a prompt asking if they want to allow you to control their device. They can either allow or deny this request.
- Control the Device:
- Once access is granted, you can swipe, tap, and interact with their screen as if it were your own. This is perfect for situations where guiding someone isn’t enough, and you need to take action directly, such as changing settings or troubleshooting an issue.
Ending the Remote Control Session
- Stop Remote Control:
- When you’re done making changes, tap the Remote Control button again to end the session.
- End Screen Sharing:
- After stopping remote control, you can continue screen sharing if needed, or you can end the screen share by tapping the Share button at the top of the screen or simply ending the FaceTime call.
7. Notes annotation (AI)
One of the standout features in iOS 18 is the enhanced voice note annotation feature in the Notes app, powered by Apple Intelligence. This feature is incredibly useful for quickly capturing and organising your thoughts, tasks, or ideas, especially when you’re on the go.
How to Use Voice Note Annotation
- Create a New Note:
- Open the Notes app and start a new note.
- Record Audio:
- Tap the paperclip icon in the menu bar to bring up attachment options.
-
Choose Record Audio from the list.
-
Press the red record button to begin recording your voice note. You can speak freely, listing out tasks, ideas, or whatever is on your mind.
-
Apple Intelligence at Work:
- As you record, Apple Intelligence is already assessing the audio. Once you finish, it provides you with two key pieces of information:
- Transcript: A text version of everything you said.
-
Summary: A concise overview of the main points discussed in the recording.
- As you record, Apple Intelligence is already assessing the audio. Once you finish, it provides you with two key pieces of information:
Enhancing Your Notes with Apple Intelligence
Here’s where Apple Intelligence really shines—organizing your recorded thoughts into actionable content.
- Add Transcript to Note:
- After recording, tap on the summary provided by Apple Intelligence.
-
Tap the ellipsis menu (three dots) at the top of the screen.
-
Select Add Transcript to Note. This will insert the full text transcript into your note, allowing you to work with the content directly.
-
Organise the Transcript:
- Tap on the text you’ve just inserted.
-
Use the writing tools icon in the menu bar to access different formatting options:
- List: Convert your transcript into a bulleted or numbered list, perfect for turning spoken tasks into a to-do list.
-
Table: Break down the tasks into a table format. For example, you can separate tasks into categories like “Inside the House” and “Outside the House,” making it easier to prioritize and manage your workload.
8. Record phone calls (AI)
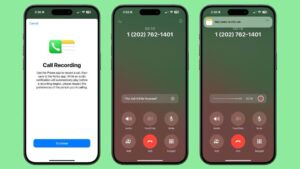
One of the standout features introduced in iOS 18, especially from a productivity standpoint, is the ability to record phone calls and have them automatically summarised and transcribed using Apple Intelligence.
How to Use Call Recording in iOS 18
- Initiate a Phone Call:
- Start a phone call as you normally would.
- Access the Recording Option:
- During the call, look at the top left of your screen. You’ll notice a new recording icon or button.
-
Tap this icon to begin recording the conversation.
-
Notification of Recording:
- A prompt will play to inform both you and the person on the other end of the line that the call is being recorded. This is crucial for transparency and legal compliance, depending on your location.
- Continue Your Call:
- Proceed with your conversation as usual. The recording will capture the entire dialogue.
- Ending the Call:
- Once you hang up, iOS 18 processes the recording using Apple Intelligence.
Post-Call Processing and Features
- Automatic Note Creation:
- After the call ends, iOS 18 automatically creates a new note in the Notes app. This note contains a comprehensive summary of the call.
- Call Summary:
- The note includes key details such as the date, time, and duration of the call.
-
You can also tap a play button within the note to listen to the entire recording.
-
Transcription and Speaker identification:
- The transcript of the call is automatically generated and inserted into the note.
-
Apple Intelligence breaks down the transcript by identifying different speakers in the conversation. This makes it easy to follow along and understand who said what during the call.
9. Reduce Interruptions Focus Mode (AI)
The new Reduce Interruptions Focus Mode in iOS 18, powered by Apple Intelligence, takes the concept of focus modes to a whole new level by intelligently managing your notifications and interruptions throughout the day.
What is Reduce Interruptions Focus Mode?
The Reduce Interruptions Focus Mode uses AI to filter out less important notifications while still ensuring you’re aware of anything that could be crucial. Unlike traditional focus modes where you manually select which notifications are silenced, Reduce Interruptions makes these decisions for you based on the content and context of incoming messages or alerts.
How to Enable Reduce Interruptions Focus Mode
- Open Settings:
- Start by opening the Settings app on your iPhone.
- Navigate to Focus:
- Scroll down and select Focus.
- Select Reduce Interruptions:
- In the Focus section, you’ll see a new option called Reduce Interruptions with the Apple Intelligence logo next to it. Tap on it to enter its settings.
- Understand the Functionality:
- You’ll notice that the toggle switch at the top is greyed out. This is because the feature is always active when you enable the Reduce Interruptions Focus Mode. The greyed-out toggle is more informational, letting you know that this mode is designed to optimize your interruptions automatically.
How Does Reduce Interruptions Work?
- Intelligent Filtering: The AI-powered mode analyses incoming notifications in real-time. If a message or alert seems important based on its content, even if it comes from a contact you usually silence during work hours, the AI will decide to notify you.
-
Contextual Awareness: For example, if you usually silence notifications from personal contacts during work, but a family member sends you an urgent message, the Reduce Interruptions mode will recognise the urgency and display the notification on your screen, often with a tag like “maybe important.”
-
Smart Summaries: The mode doesn’t just alert you to important messages but also provides a brief summary of why it thinks the notification is important. This reduces the risk of missing crucial information while still keeping distractions to a minimum.
10. Mail & Apple Intelligence (AI)

The Mail app in iOS 18 has seen significant improvements thanks to Apple Intelligence, making it smarter and more efficient for handling your emails. Let’s explore the new features.
Priority Inbox
- What It Does: The Priority Inbox is a new feature automatically created by Apple Intelligence. It prioritises emails that are most important to you, ensuring that you see them at the top of your inbox. This feature analyses your email patterns and interactions to determine which emails you should see first.
-
Accuracy: In my experience, the Priority Inbox is extremely accurate. Emails from frequent contacts, important notifications , and anything that requires immediate attention are consistently surfaced at the top, making it easier to manage your inbox.
Email Summaries
-
In Inbox View: One of the standout features is the ability to see email summaries directly within your inbox. This means you can quickly get the gist of an email without having to open it. The summaries are concise yet detailed enough to give you all the essential information at a glance.
-
Inside Emails: When you do open an email, you can scroll to the top and tap the “Summarise” button. This provides a summary of the email or, in the case of an email thread, a summary of the entire conversation. This is particularly useful for long email threads where you need to catch up quickly.
-
Increasing Accuracy: Apple Intelligence learns and adapts to your preferences over time. The more you use the feature, the more accurate and relevant the summaries become, making the Mail app a powerful tool for managing your communications.
Upcoming Features in the Mail App
While the current enhancements are already impressive, Apple has hinted at a complete redesign of the Mail app that will include automatic email categorisation. This feature is expected to take the Mail app to the next level by automatically sorting your emails into categories like “Promotions,” “Social,” “Updates,” and more, similar to how Gmail operates. This will further streamline your email management and help you focus on what’s most important.