File management on the iPhone does leave a lot to be desired, especially when compared with the Mac, but when you know how to use the Files app on your iPhone, it’s actually better than you think.
The problem, I believe, is that people open the Files app, find it daunting, then close it, never to return. So in this guide, I’ll cover the Files app on the iPhone in detail.
Note: the steps in this guide were written using iPhone running iOS 18, but they will work on iOS 17 as well.
Contents
- Navigation Overview
- Recents
- Shared
- Browse
- The ellipsis menu
- Recently Deleted
- Viewing Files
- Interacting with files
- Extra options
- File Options Menu
- Long-Press Menu
- Long-Press Menu (continued)
- Practical Examples
- General Tips
- Connecting External Drives
- Handling different file types
- Handling different file types (continued)
- Working with images in the Files App
- Viewing and interacting with images
- Sharing Files & Folders
- Sharing Files & Folders (continued)
- Managing Shared Folders
- Saving Email Attachments
- Working with Zip files
- Favourites
- Favourites (continued)
- Tags
- Tags (continued)
- Search
- Search (continued)
- View Options
You have three main view options at the bottom of the screen:
Recents, Shared, and Browse.
Notice the navigation options down at the bottom of the screen
Recents
Location: Bottom left
Function: Displays files opened or edited in chronological order.
Search: Use the search box at the top to find specific files.
Location: Centre bottom
Function: Shows files shared with you and files you have shared with others.
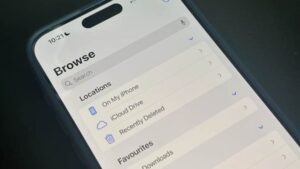
Browse
Location: Bottom right
Function: Similar to Finder on a Mac.
Subsections:
- Locations: Various storage locations.
- Favourites: Frequently accessed files.
- Tags: Organised by tags for easy retrieval.
Locations is where you do most of your browsing in the Files app
You can add folders to Favourites, which makes it quicker to access them later
Tags can be used to help you search for files
Location: Upper right of the screen
Function: Important features throughout the Files app.
When you tap on the ellipsis menu in the upper-right of the screen, you’ll have a lot of the options you’ll want to use, so keep in mind it’s almost always there.
Options:
Scan a Document: Tap, position document, adjust file type, and scan.
Connect to Server: Use to connect to a server, like a NAS drive.
- Enable/Disable Locations: Toggle different file locations.
- Visible Locations: iCloud Drive, On My iPhone, Dropbox, etc.
- Add Cloud Providers: Download relevant app, log in, and integration happens automatically.
- Adjust Priority: Use the tab to drag locations in preferred order.
Recently Deleted
- Location: Beneath file locations
-
Function: Stores recently deleted files for recovery.
Viewing Files
Steps to View:
-
Tap into the location you wish to view. iCloud Drive for your iCloud content, On My iPhone for local content on your iPhone, or Dropbox (or another cloud provider) for the files stored there.
-
Use the ellipsis menu to change the view from icons to list if preferred.
-
Tap into folders, and tap on files you wish to view.
Interacting with files
Viewing a PDF
Open PDF: Tap on the file to open it in Quick Look.
Extra options
- Bottom left corner.
-
Send a copy or collaborate with others.
-
Search: Look for specific words within the PDF.
-
Markup: Bottom right corner, use various tools to annotate the PDF.
The Done button (to the left) is for when you’ve finished
working with the file
The Share button
(bottom left) allows you to share or
collaborate on the file
The Search button (above, centre) allows you to search within the PDF
The pen icon is Markup, which allows you to draw on the PDF
File Options Menu
Access: Tap the file name at the top.
Available Actions:
- Lock: Secure the PDF.
-
Duplicate: Create a copy of the file.
-
Move: Change the file’s location.
-
Rename: Change the file name.
-
Print: Print the file.
-
Share: Similar to the Share option at the bottom left.
Long-Press Menu
Access: Tap and hold the file.
Prominent Options: Copy, Move, Share.
Remove Download:
- Offloads the file from the device but keeps it in iCloud.
-
Tap to download the file again when needed.
Delete:
-
Permanently removes the file from both the device and iCloud.
-
Use with caution.
Long-Press Menu (continued)
-
Quick Look: Preview the file.
-
Get Info: View detailed information about the file.
-
Done Button: Exit the information view.
Quick Actions
-
Access: Tap Quick Actions in the menu.
-
Examples:
- Markup: Annotate the file.
-
Optimise File Size: Reduce resolution of images in a PDF to make it smaller.
Practical Examples
Duplicate a File:
-
Tap and hold the file.
-
Select Duplicate.
-
Creates a new file with a numbered name.
Select Multiple Files:
-
Tap the ellipsis in the upper right.
-
Tap Select.
-
Choose files to share, duplicate, move, or delete.
Create a PDF from Multiple Files:
-
Select the files.
-
Tap the ellipsis.
-
Choose Create PDF.
General Tips
Landscape Mode: Works in landscape if orientation lock is disabled.
Quick Selection: Use two fingers to swipe down and select multiple files quickly.
Connecting External Drives
Modern iPhones (iPhone 15 and 15 Pros)
- USB-C Port: Supports power delivery.
-
Steps to Connect:
- Connect USB-C cable to the SSD.
-
Plug the other end into the iPhone.
-
Drive appears under the Browse section in the Files app.
-
Usage: Identical to working with files on iCloud Drive or the device.
-
Ejecting: No need to eject before removal.
Older iPhones (iPhone 14 and earlier)
-
Required Accessory: Lightning to USB 3 Camera Adapter (available from Apple).
-
Additional Setup:
- Two Cables Needed:
- One to power the adapter (connect to a wall outlet or power bank).
-
Another to connect the adapter to the external drive.
-
Plug the setup into the iPhone.
- Two Cables Needed:
-
Functionality: Allows access to external drives on older models.
Handling different file types
Downloading Files from iCloud
-
Cloud Icon: Indicates the file is stored only in the cloud.
-
Download Options:
-
Tap the cloud icon to download.
-
Tap the file to open it and download automatically.
-
Handling different file types (continued)
Pages Files Example
-
Opening Without the App:
- Files open in Quick Look preview if the Pages app is not installed.
- Opening With the App:
- Download the Pages app from the App Store.
-
Tap the file in Files app to open it in the Pages app.
-
Tap the Edit button in the upper right to edit the document.
-
Changes are automatically saved and reflected in the Files app.
General Behaviour for Apple Apps
-
Keynote and Numbers: Similar process to Pages.
-
App Integration: Files will open in the corresponding app if installed, allowing for full editing capabilities.
Working with images in the Files App
Saving Images to Files
-
Capture Method: Images are usually dealt with in the Photos app.
-
Transfer from Photos to Files:
- Open the image in the Photos app.
-
Press the Share button.
-
Scroll down and choose Save to Files.
-
Select the desired folder in Files and press Save.
Viewing and interacting with images
Open Image in Files:
-
Browse to the saved location in Files.
-
Tap the image to open in Quick Look.
Options in Quick Look:
-
Limited compared to the Photos app.
-
Tap and hold on the image to access more options.
Quick Actions for Images
-
Rotate: Rotate the image 90º left or right.
-
Create PDF: Convert the image or multiple images into a PDF.
-
Convert Image:
- Change image format to JPEG, PNG, or HEIF.
-Select image size (small, medium, large, original).
Sharing Files & Folders
-
Access: Bottom middle of the screen.
-
Function: View files and folders shared with you or by you. Sharing a Folder
-
Steps to Share:
- Go to Browse and find the folder.
-
Tap and hold on the folder.
-
Tap the Share button at the top of the screen.
-
Options:
- Send a Copy: Sends the folder’s contents to another person.
-
Collaborate: Adds the person as a collaborator in iCloud Drive.
Sharing Files & Folders (continued)
Collaborate Option
-
Functionality:
- Collaborators can view, edit, add files, and folders.
-
Changes are reflected for all collaborators.
-
Sending Request:
- Send collaboration request via message, email, AirDrop, whatever you like.
-
Recipient must accept to start collaborating.
-
Tap into the folder.
-
“Shared by me” label at the top with an Options button.
Options Button:
-
Share with More People: Add or remove collaborators.
-
Share Options:
- Control access permissions (view or edit).
-
Allow or disallow adding more people.
-
Copy Sharing Link: Share the link with others.
-
Stop Sharing: End collaboration and access.
Saving Email Attachments
PDF Example:
-
Save to Documents:
- Tap the download button in the Mail app.
-
Choose Save to Documents.
-
File saves to iCloud Drive in the Documents folder.
-
Save to Downloads:
- Similar process, but file saves to iCloud Drive in the Downloads folder.
- Save Attachment:
- Allows selecting a specific location.
-
Choose a folder, including On My iPhone for offline access.
-
Press Save.
Working with Zip files
-
Creating a Zip File:
-
Traditional Method:
- Create a folder in Files.
-
Select photos in Photos app.
-
Share photos to Files app.
-
Select files in Files app, create a zip file, and send via email.
-
Using Shortcuts App:
- Ensure Shortcuts app is installed.
-
Open Shortcuts app, tap Gallery, and search for “zip.”
-
Add the “Zip and Email” shortcut.
-
Select images in Photos app.
-
Press Share, scroll to “Zip and Email,” and send.
Unzipping a File:
-
Received via Email:
- Tap the save button on the right-hand side of the email.
-
Choose Save to Downloads.
-
Uncompressing:
-
Go to Files app and open Downloads folder.
-
Tap and hold the zip file, choose “Uncompress.”
-
Alternatively, just tap the file to uncompress automatically.
-
Favourites
Adding to Favourites:
-
Tap and hold on a folder.
-
Select “Favourite” from the contextual menu.
-
The folder is added to the Favourites section under Browse.
Favourites (continued)
Removing from Favourites:
-
Swipe from right to left and select “Remove.”
-
Tap the ellipsis menu, press “Edit,” then press the red circle with the white line and choose “Remove.”
-
Tap and hold the folder, then choose “Remove” from the menu.
Tags
Using Tags:
-
Tap and hold on a file.
-
Select “Tags” from the contextual menu.
-
Choose from default color tags or add a new tag by selecting “Add New Tag.”
-
Assign a name and color to the new tag.
-
Select multiple tags if needed and press “Done.”
-
Tagged files show circles with the tag names.
Tags (continued)
Managing Tags:
-
Tap and hold on a tag to rename or delete it.
-
To view tagged files, go to the Browse page and tap on a specific tag.
Search
Using Search Bar:
-
Tap the search bar and enter a term (e.g., “contract”).
-
View files and folders that match the term.
-
Refine search by adding more specific terms (e.g., “blue” for tagged files).
Search (continued)
Spotlight Search:
-
Access Spotlight Search by tapping the search button on the home screen or swiping down.
-
Enter a term to search across the entire device, including Files and iCloud.
-
Directly access files from Spotlight Search.
View Options
Accessing View Options:
-
Tap the ellipsis in the top right of a folder.
-
Select “View Options” at the bottom.
Grouping and Sorting:
-
Group by kind, creation date, size, or who shared the file.
-
Sort by kind, creation date, edited date, size, or tags.
Icon and List Size:
-
Choose between default and compact views.
-
Show file name extensions for better file identification.